What's an API Key and How Authentication Works
Listen to this lesson
What's an API Key and How Authentication Works
Course: Building with AI APIs | Pathway: Builder | Level: Advanced
Estimated Reading Time: 8 minutes
The Key to the Kingdom
You've been using AI through chat interfaces — typing into ChatGPT or Claude and getting responses back. But underneath every one of those conversations, there's a programmatic connection happening. Your browser is sending requests to an API, and that API needs to know who you are.
That's what authentication is: proving your identity to a service so it knows you're allowed to use it, and so it can bill the right account.
Let's break down exactly how this works.
What's an API?
API stands for Application Programming Interface. It's a structured way for one piece of software to talk to another. When you use the OpenAI API, you're sending a precisely formatted request to OpenAI's servers, and they send back a precisely formatted response.
Think of it like ordering at a restaurant. The menu is the API documentation (here's what you can ask for), your order is the request, and the food is the response. The waiter? That's HTTP — the protocol carrying messages back and forth.
API Keys: Your Digital ID Card
An API key is a long string of characters — something like sk-proj-abc123def456... — that identifies your account. Every time you make a request, you include this key. The service checks it and says, "Right, that's the account belonging to this person, they're on the free tier, they've used 12,000 tokens today."
Here's what an API key does:
- Identifies you — ties the request to your account
- Authorises access — confirms you're allowed to use this endpoint
- Tracks usage — every call gets logged against your account for billing
- Enforces limits — the service can throttle you if you hit rate limits
Most AI services use API keys as the primary authentication method. OpenAI, Anthropic, Google's Gemini, Mistral — they all work roughly the same way.
How API Keys Are Sent
The standard way to send an API key is in the request header as a Bearer token. Here's what that looks like:
import requests

headers = {
    "Authorization": "Bearer sk-proj-your-api-key-here",
    "Content-Type": "application/json"
}

response = requests.post(
    "https://api.openai.com/v1/chat/completions",
    headers=headers,
    json={"model": "gpt-4o", "messages": [{"role": "user", "content": "Hello"}]}
)
const response = await fetch("https://api.openai.com/v1/chat/completions", {
  method: "POST",
  headers: {
    "Authorization": "Bearer sk-proj-your-api-key-here",
    "Content-Type": "application/json"
  },
  body: JSON.stringify({
    model: "gpt-4o",
    messages: [{ role: "user", content: "Hello" }]
  })
});
The Authorization: Bearer <token> pattern is the most common format across APIs. Some services use custom headers instead — Anthropic, for instance, uses x-api-key — but the concept is identical.
Beyond API Keys: Other Authentication Methods
API keys aren't the only way to authenticate. Depending on what you're building, you might encounter:
OAuth 2.0
OAuth is what's happening when you click "Sign in with Google" on a website. Instead of sharing your password with every service, OAuth lets a trusted provider (Google, GitHub, etc.) vouch for you by issuing a temporary token.
OAuth is more complex than API keys, but it's essential when your app needs to act on behalf of a user — for example, reading their Gmail or posting to their social media.
The flow, simplified:
- Your app redirects the user to the provider (e.g, Google)
- The user logs in and grants permission
- The provider redirects back with an authorisation code
- Your app exchanges that code for an access token
- You use the access token in your API calls
You won't need OAuth for most AI API calls, but you'll encounter it when chaining AI with other services (more on that in Lesson 5).
Service Account Keys
For server-to-server communication (your backend talking to Google Cloud, for example), you might use a service account — a JSON file containing credentials that your application uses to authenticate without any human interaction.
API Key + Organisation ID
Some services (like OpenAI) let you scope keys to specific organisations or projects. This is useful when you're working across multiple teams or billing accounts.
Keeping Secrets Safe
Here's the most critical lesson in this entire course: never, ever put API keys in your code.
It sounds obvious, but it's the single most common mistake beginners make. Every week, people accidentally push API keys to GitHub and wake up to a bill for thousands of dollars because bots scan public repositories for exposed keys.
Environment Variables
The standard approach is to store keys in environment variables:
import os

api_key = os.environ.get("OPENAI_API_KEY")
const apiKey = process.env.OPENAI_API_KEY;
You set these in your system or in a .env file that's explicitly excluded from version control.
The .env File Pattern
Most projects use a .env file locally:
# .env — NEVER commit this file
OPENAI_API_KEY=sk-proj-abc123...
ANTHROPIC_API_KEY=sk-ant-abc123...
DATABASE_URL=postgresql://user:pass@localhost/mydb
Then add it to .gitignore:
# .gitignore
.env
.env.local
.env.production
Use a library like python-dotenv (Python) or dotenv (Node.js) to load these automatically.
In Production
When deploying, use your hosting platform's secrets management:
- Vercel/Netlify: Environment variables in the dashboard
- AWS: Secrets Manager or Parameter Store
- Railway/Render: Built-in environment variable settings
The principle is always the same: keys live in the environment, not in the code.
What to Do If You Leak a Key
- Revoke it immediately — go to the provider's dashboard and delete the compromised key
- Generate a new one — replace it everywhere it's used
- Check your billing — look for unauthorised usage
- Scrub your git history — the key is in your commit history even if you delete the file (use
git filter-repoor BFG Repo-Cleaner)
Most providers offer usage alerts and spending limits. Set these up before you start building. OpenAI lets you set a hard cap; Anthropic has usage limits per workspace. Use them.
A Quick Note on Key Permissions
As you get more sophisticated, think about the principle of least privilege: each key should only have the permissions it needs. If your app only reads data, don't give it a key that can also write. If it only uses one model, restrict it to that model.
OpenAI's project-scoped keys and Anthropic's workspace system both support this. It's not just good security — it limits the damage if something goes wrong.
Key Takeaways
- API keys identify your account and are sent with every request, typically as a Bearer token in the Authorization header
- Never put keys in your source code — use environment variables and
.envfiles, always excluded from version control - Set spending limits and alerts on every AI service you use, before you start building
- OAuth is for acting on behalf of users; API keys are for your application talking directly to a service
- If you leak a key, revoke it immediately — bots scan public repos within minutes
Practical Exercise
Set up a secure API key workflow:
- Create a new project folder
- Create a
.envfile with a placeholder:OPENAI_API_KEY=your-key-here - Create a
.gitignorefile that excludes.env - Write a small script (Python or JavaScript) that reads the key from the environment and prints the first 8 characters followed by
...(to confirm it loaded without exposing the full key) - Initialise a git repo, commit your code, and verify that
.envis not tracked
This is the workflow you'll use for every project going forward.
Knowledge Check
1. Where should you store API keys in your application?
a) Directly in your source code for easy access
b) In environment variables or a .env file excluded from version control
c) In a comments section of your main file
d) In a public configuration file
Answer: b) API keys should always be stored in environment variables or .env files that are excluded from version control via .gitignore.
2. What does the Authorization: Bearer header do?
a) It encrypts the API request
b) It sends your API key to authenticate your request
c) It specifies which AI model to use
d) It sets the response format
Answer: b) The Bearer token in the Authorization header carries your API key (or access token) so the service can identify and authenticate your request.
3. What should you do first if you accidentally push an API key to a public GitHub repository?
a) Delete the file and push a new commit
b) Make the repository private
c) Revoke the key immediately in the provider's dashboard
d) Contact GitHub support
Answer: c) Revoke the key immediately. Deleting the file doesn't remove it from git history, and making the repo private doesn't undo exposure. Revocation is the only way to prevent misuse.
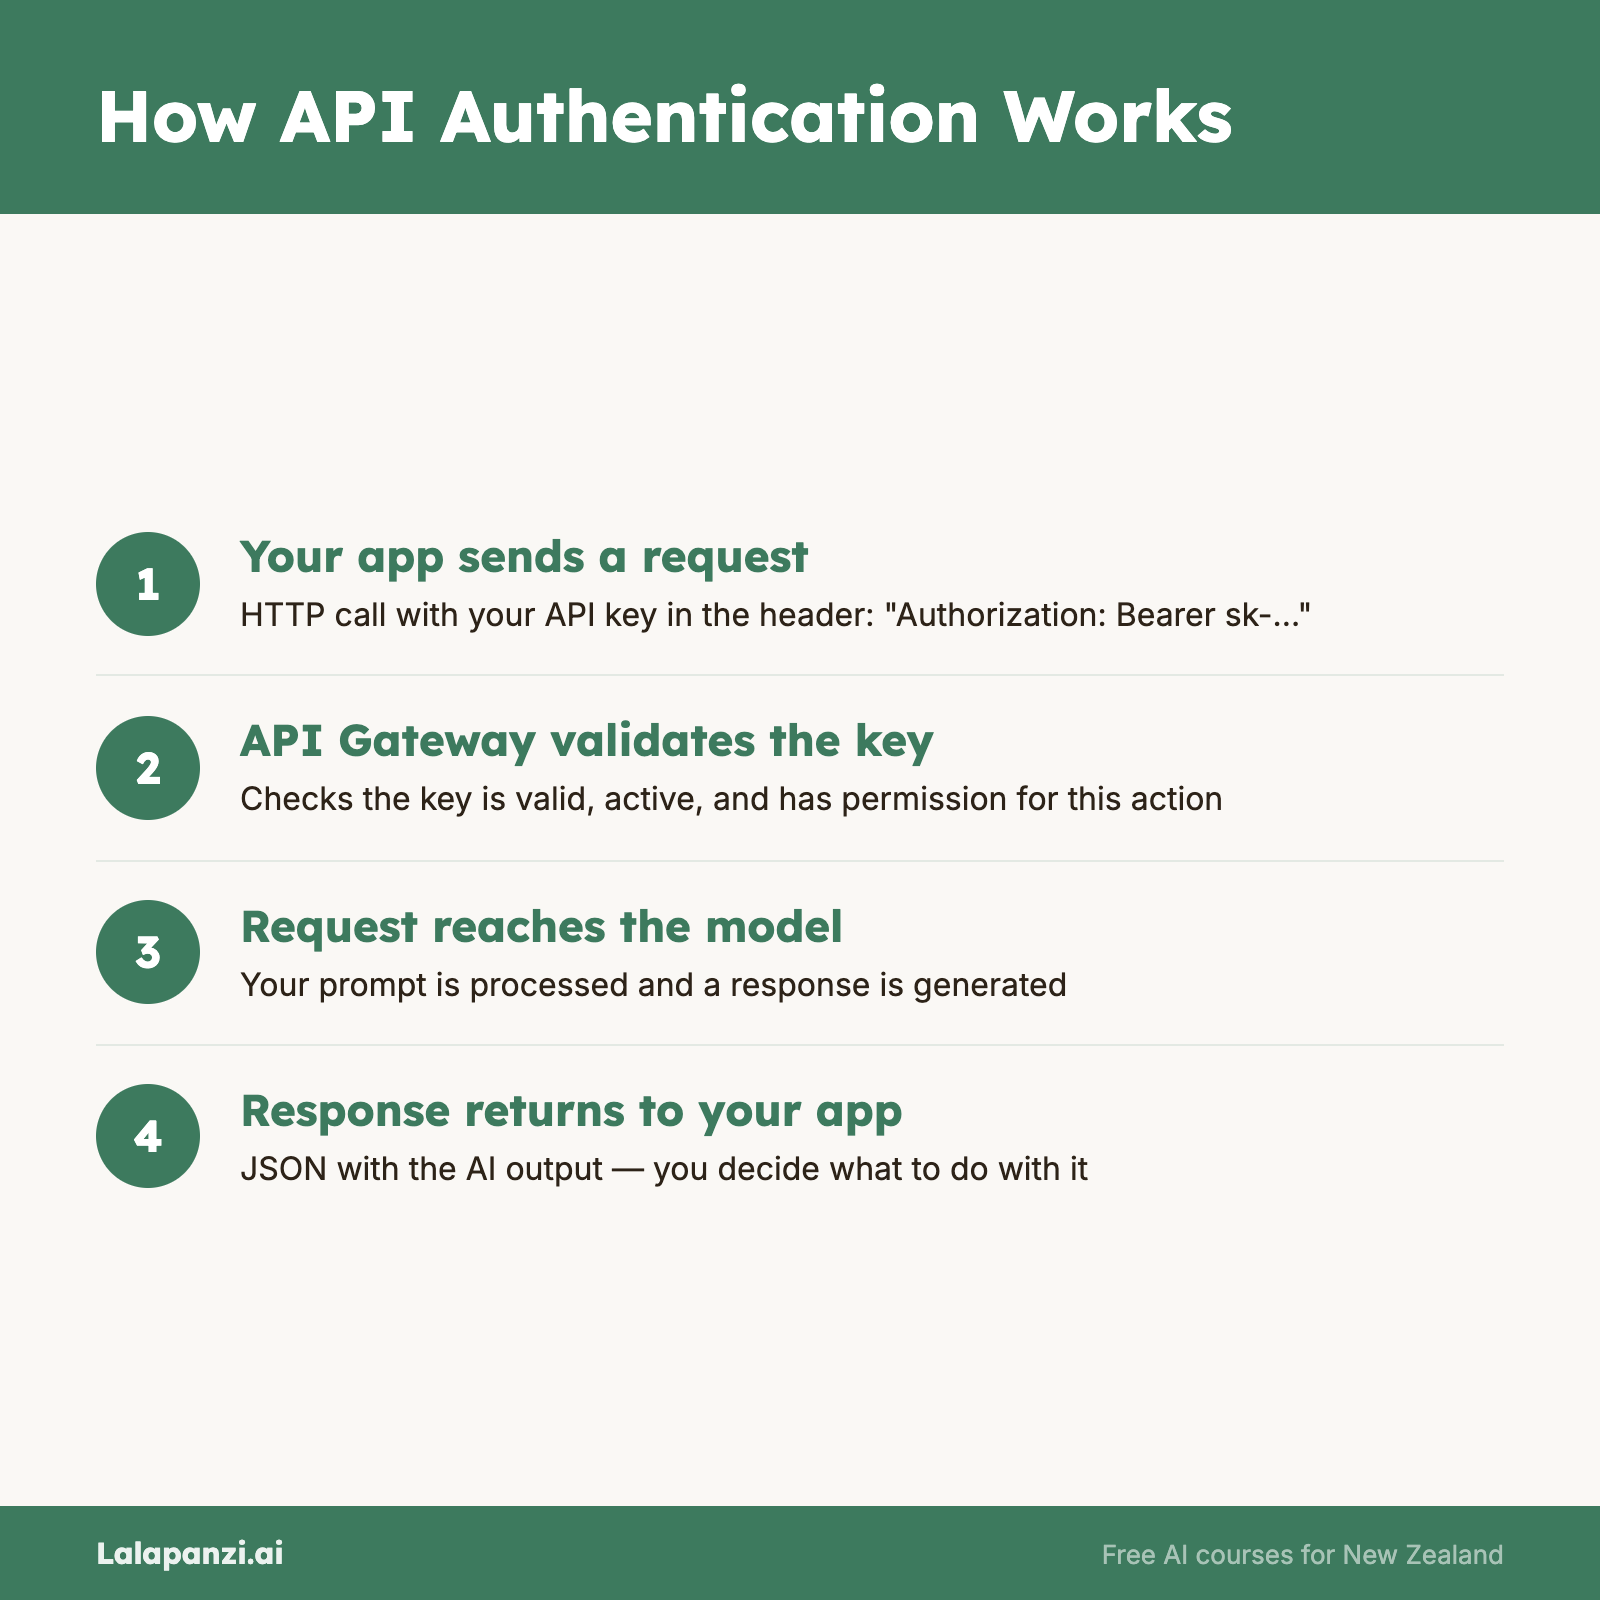
Visual overview